How to add a Sentry user feedback dialog to Plone error pages
Sentry.io includes a feature that pops up a nice looking dialog box to ask the user for more information (their name, email address, and what they were doing or trying to do) when an error occurs in your software. (Read more in the Sentry blog post or in the Sentry user documentation.)
For Plone, this is most easily used by customizing the default_error_message.pt page template.
Setting up Sentry
First, you have to sign up with Sentry (you may be able to use just the free service), and create a project if you haven't already done so (as I described in my previous blog post).
Then, in your Sentry dashboard, click on the User Feedback button to take you to a page that shows the JavaScript code you need. That code contains your unique Sentry project ID.
Warning: set up whitelisted domains
Because anything exposed on the public internet can be abused, you need to specify which domain(s) Sentry should accept this dialog box connection from.
You do this by going to your Sentry project settings page, scrolling down to "Allowed Domains", and provide (one per line) the domain(s) that should show the user feedback dialog box.
Customizing Plone to show the Sentry user feedback dialog
Note: the following has been tested with Plone 4.2.
In your Plone site, go to the Management Interface, e.g. mysite.com/manage_main, then portal_skins, plone_templates, default_error_message.
Click the Customize button. (Note: you may have already customized this template, in which case go to portal_skins/custom to find your already-customized default_error_message).
If you look at the structure of the default_error_message page template, you'll see there are two major <metal> tags: one to handle "not found" errors (<metal:notfound tal:condition="python:err_type=='NotFound'">), the other to handle everything else (<metal:othererror tal:condition="python: err_type!='NotFound'").
At the end of each of these two tags you will insert your JavaScript code. It should looks like this for the "not found" <metal> tag:
<!-- Sentry JS SDK 2.1.+ required -->
<script src="https://cdn.ravenjs.com/2.1.0/raven.min.js"></script>

<script>
// configure the SDK as you normally would
Raven.config('https://[email protected]/MOREUNIQUEID').install();
function handleRouteError(err) {
 Raven.captureException(err);
 Raven.showReportDialog();
};

err = new Error('404')
handleRouteError(err);
</script>
and to handle any other type of error, at the end of the "everything else" <metal> tag:
<!-- Sentry JS SDK 2.1.+ required -->
<script src="https://cdn.ravenjs.com/2.1.0/raven.min.js"></script>

<script>
// configure the SDK as you normally would
Raven.config('https://[email protected]/MOREUNIQUEID').install();
function handleRouteError(err) {
 Raven.captureException(err);
 Raven.showReportDialog();
};

err = new Error('other error')
handleRouteError(err);
</script>
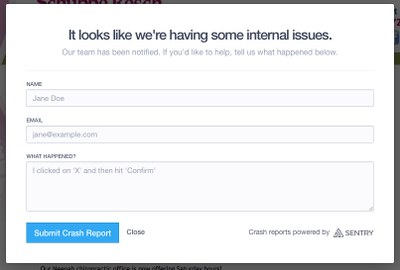
Now when a person encounters that Plone error page, either because of a missing content item or some other problem, they will be presented with a dialog box like this:

Even if they don't fill it out or, say, it was a search engine crawler that caused the error, Sentry will still receive the error and you will be notified and will see it in the dashboard.
Any information provided by the user in the dialog box will also appear, giving you sometimes just that extra tidbit of information you need to figure out what caused the problem.

